The Ultimate Guide to the 1G Welding Position for Beginners
Why the 1G Welding Position Matters for Beginners
If you are just getting into welding, you will likely hear about the 1G welding position early on, often referred to as the “flat” or “horizontal” position. In this setup, your workpiece (usually a plate or pipe) is placed so that you weld along a flat plane. Because gravity naturally pulls the molten weld pool downward onto the base metal, beginners find it simpler to control their weld bead. This steadiness can help you build confidence quickly.
In many training courses, the 1G welding position approach is taught first because it offers stability, fewer awkward angles, and less overall strain on your arms and shoulders. If you compare it to vertical or overhead welding, it is generally more forgiving. You are less likely to deal with spatter dripping onto your hands or arms, which reduces distractions and boosts safety. Good news! This is easier than it sounds once you understand the basic movement patterns. If you are curious about other welding positions, you can check out how many types of welding positions are there for a quick overview.
Professionals still rely on the 1G welding position for efficiency and quality. Fabricators like Red River use it for ASME-certified pressure vessels, welding pipes horizontally in controlled facilities for consistent results and reduced on-site work.
Why does 1G welding position matter? Imagine a scenario where you need to join metal parts for a modular skid (a framework that houses equipment for oil and gas operations). Fabricating and welding these modules in 1G welding positions drastically reduces overhead tasks. Handle the joints in a flat position, complete your weld, and cut the chance of misalignment. In some cases, removing the complexity of vertical or overhead welding can also reduce the risk of weld defects.
As a starting point, the 1G welding position builds essential skills like puddle control, travel speed, and electrode handling while forming the foundation for advanced techniques.
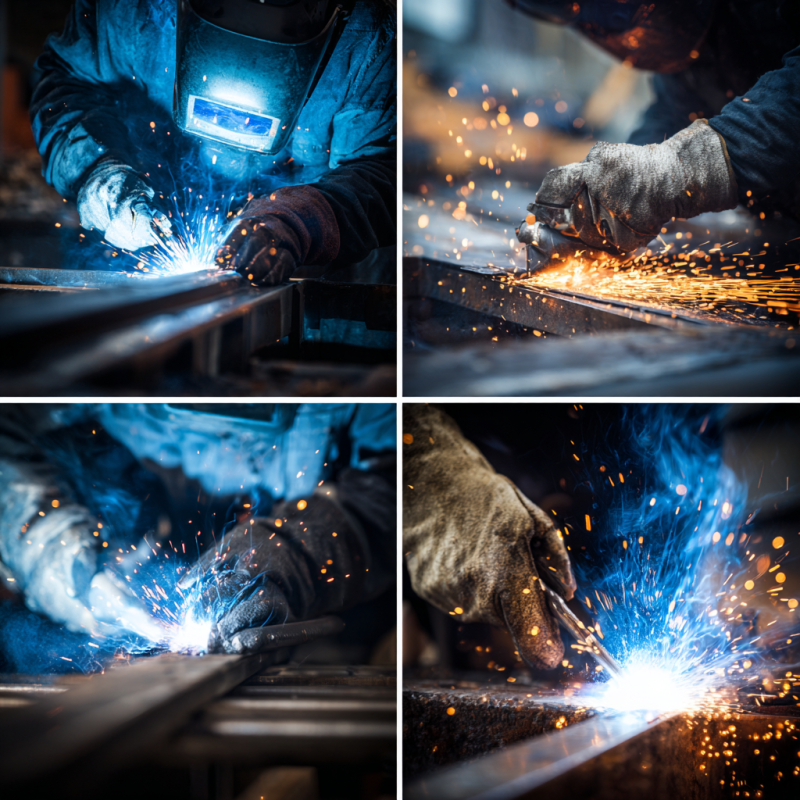
Use the right gear
Before starting in the 1G welding position, gather basic gear: a welding machine, proper electrodes or filler rods, safety equipment, and supporting accessories. Because 1G welding position works with MIG, TIG, or stick welding, match your setup to the process. Many beginners start with MIG for its simple, user-friendly controls.
Below is a quick-reference table to help you visualize the gear essentials:
| Item | Purpose | Beginner Tip |
| Welding machine | Generates the power for your weld | Look for an entry-level inverter MIG machine |
| Electrodes/filler rods | Supplies the molten metal | Stick to recommended rod diameter (e.g., 1/8″) |
| Protective clothing | Keeps sparks at bay | Flame-resistant jacket or welding sleeves |
| Helmet with visor | Shields eyes and face | Auto-darkening feature for convenience |
| Gloves | Protects hands from heat | Use welding-specific gloves for better dexterity |
| Safety boots | Guards feet against falling debris | Steel-toe boots are a plus |
| Chipping hammer/brush | Removes slag and cleans welds | Helpful if you are stick welding |
Safety gear is non-negotiable. Whether you are working on a small practice coupon or a large pressure vessel, sparks can fly, and metal can heat up fast. Helmets with auto-darkening visors make it easier to keep your eyes on the weld puddle at all times. Gloves, jackets, and safety boots prevent stray sparks or hot metal from causing injury. Also consider hearing protection, as the crackling of a live arc can be surprisingly loud depending on the environment.
At Red River, skilled welders stress that using the right gear sets you up for success immediately. Their teams are ASME certified, carrying U4 & R stamps that represent rigorous quality standards for manufacturing pressure vessels. According to these pros, half the battle in 1G welding position is making sure your machine settings and protective equipment match the task. By nailing down your setup now, you can focus on the weld, not on sudden adjustments mid-job.
If you’re unsure which welding machine to buy, brand catalogs list power needs and recommended wire or rod sizes for different metals. This helps fine-tune your technique. Check welding positions to see how the 1G welding position fits with flat, horizontal, vertical, and overhead setups. Don’t forget simple tools like an angle grinder for clean edges and a wire brush to remove rust or paint.
Practice the welding technique
When you are ready to lay your first bead in the 1G welding position, remember that each welding process has its own best practices. Still, some broad tips apply across the board:
- Position your body: Keep arms relaxed, elbows slightly bent, and your torso close to see the weld pool. A flat stance reduces strain and keeps travel speed steady.
- Set your heat and wire feed (for MIG):Match machine settings to metal thickness. Too little heat limits penetration; too much causes burn-through. Check wire or electrode packaging for voltage and amperage.
- Maintain consistent travel speed: Move smoothly. Too slow overheats the bead; too fast causes thin or incomplete fusion.
- Use the right torch angle: Hold a 10–15° drag or push angle for best gas coverage and heat direction. With stick welding, tilt the electrode slightly toward the puddle.
- Watch your puddle: Keep the molten pool glossy and even, adjusting motion to prevent undercut or buildup. Practice makes this instinctive.
In some professional settings, especially large prefabricated modules, consistent technique reduces weld failures like porosity or cracking. Red River welders note that controlling heat and bead profile in the 1G welding position cuts rework and improves product integrity. For advanced tasks such as multi-phase separators or knockouts in oil and gas, steady beads save hours of costly re-welding.
Beginners can practice by marking a grid on scrap steel and running welds along the lines. Adjust speed, angle, or amperage each pass and note the results. For a quick overview of the basics, check out what the 1G welding position is for its meaning and applications.
Be patient. Welding relies on muscle memory and visual awareness, so regular practice builds the instinct for clean, consistent beads.
Adopt proper safety measures
Welding safety in the 1G welding position may feel easier with work laid flat and fewer overhead sparks, but it’s still critical. Maintain a clean workspace, wear protective gear, and follow proper procedures. Industry data shows inattentiveness causes many minor accidents, and even in 1G, hot metal fragments can still fly toward you or others.
Many workplaces use a simple blueprint for safety:
- Inspect your cables and connections for damage (no frays or exposed wires).
- Ensure the ground clamp is secure; a weak ground can cause a shaky arc.
- Keep flammable items away from your welding area (rags soaked in oil, scrap paper).
- Ventilate the space to clear harmful fumes from flux or shielding gases.
- Wear all your protective equipment, from helmet to flame-resistant jacket.
At Red River, safety is woven into daily routines. The company aims for ongoing engagement and innovation in safety. Welders are encouraged to brainstorm improvements, whether that is a new type of clamp to secure a workpiece or an improved exhaust hood to lower fumes. If you are in a smaller shop or practicing at home, you can still apply these ideas. Check for airflow issues, keep your environment clutter-free, and store your gear neatly.
When you master the 1G welding position, you might eventually tackle vertical or overhead welds. Keep in mind that as you progress, the safety steps remain the same, only the complexity of the weld changes. That is why building strong, safe habits now will pay dividends down the road. Some welders even incorporate a “mini-checklist” (helmet on, sleeves down, gloves on, ground clamp secure) before every session. You could do the same and avoid a painful mistake later.
Overcome usual challenges
Beginners often face a few common hurdles with the 1G welding position. The problems may include uneven beads, lack of fusion, or too much spatter.
- Uneven bead: If your weld bead is wavy or inconsistent, you might be moving your torch at an unsteady speed. Practice slowly tracing a straight line at a consistent pace. Also, ensure that your arms are positioned so you can move fluidly without jerking or straining.
- Lack of fusion: Sometimes, the weld bead doesn’t fully meld with the base metal. This typically means you are either running too cold or zipping across the surface too quickly. Try increasing your amperage slightly and slow your travel speed until you see the edges of the bead blend smoothly into the base metal.
- Excess spatter: Spatter can result from incorrect voltage settings, poor shielding gas coverage, or an erratic arc. Double-check your shielding gas flow (if using MIG) and ensure your electrode angle is not too steep. Also, confirm that your metal is clean; oil, dirt, or rust can cause spitting and popping.
While the 1G welding position is considered simpler than, say, the 6g welding position, it still requires fine-tuning. At Red River, welders emphasize that troubleshooting is part of the job (even for seasoned pros). They might adjust wire feed speed in small increments, reposition themselves for better visibility, or sand down rough edges to avoid contamination. This iterative process helps you learn quickly. Write down what you do each session like machine settings, electrode type, metal thickness, and your result so you can pinpoint what works best.
If you get stuck, you are not alone. Ask a mentor or check resources like how to weld in 1G welding position if you need deeper guidance on angles and technique. Sometimes, just a slight shift in torch handling or a small bump in amperage can turn shaky beads into smooth, uniform welds. The key is to remain open to experimentation and not see each flaw as a failure but rather a stepping stone.
Explore advanced applications
Once you have a handle on the essentials, the 1G welding position can open doors you might not have expected. For instance, Red River’s work on Custom/OEM Pressure Vessels often starts with plates or cylinders laid flat. These components then become parts of a larger assembly that might get shipped to an oil field or process plant. Because the sections are welded in 1G, the final vessel exhibits a consistent bond with minimal rework. This also keeps the incident rate lower (fewer hours on-site in precarious positions).
Here are a few advanced uses where 1G shines:
- Prefabricated modules and spool packages: In many industrial projects, large pipe segments are welded in 1G, inspected, and then transported for final installation. This cuts down on field welds, which are more prone to defects due to wind, uneven ground, or awkward angles.
- Multi-pass welds on thick metal: Some pressure vessels or structural beams require multiple weld layers (called passes). Doing this in a horizontal orientation allows for better bead stacking. You can control each pass more easily, ensuring proper fusion between layers.
- Testing and certifications: If you decide to get certified (for example, under ASME guidelines), you will likely go through a weld test in the 1G welding position first. Passing that test shows employers you can handle flat-position welding with confidence. It is a stepping stone to higher-level qualifications.
- Custom projects: Because 1G is direct and reliable, people use it for artisanal metalwork, think of custom furniture frames that demand solid welds. Even at a hobby level, the flat position helps produce neat, cosmetically pleasing beads with less chance of dripping or warping.
As you step into advanced projects, keep your fundamentals fresh. Remember to remain data-aware when picking your parameters. For instance, if you are working on a 0.25-inch steel plate, read up on recommended voltage/amperage from charts provided by your machine manufacturer. Make a few practice passes on scrap before touching costlier materials. You will see professionals do exactly that. They might create a few test coupons for a weld procedure specification (WPS) and check them via x-ray or ultrasonic methods to confirm no hidden flaws.
Though the 1G welding position looks simple at first glance, its reach extends into some of the most intricate industrial tasks out there. By continually refining your technique and understanding the interplay of heat, speed, and position, you set the stage for tackling bigger, more complex jobs in the future.
Compare 1G with other positions
Your confidence in the 1G welding position might also make you curious about other welding orientations. Here is a quick comparison:
| Position | Orientation | Skill Level Needed | Typical Use Cases |
| 1G (Flat) | Workpiece is horizontal | Easiest to learn for beginners | Basic projects, prefabrication |
| 2G | Horizontal groove weld | Slightly more challenging | Pipe welding where the pipe is vertical |
| 3G | Vertical weld | More challenging | Structural welding, building frames |
| 4G | Overhead welding | Considerably difficult | Repair work on installed overhead parts |
| 5G | Fixed pipe, horizontal | Advanced | Pipe systems in tight layouts |
| 6G | 45-degree fixed pipe | Very advanced | Certification tests, specialized pipelines |
You might wonder, which welding position is the easiest. The answer often points to 1G. You can see in the table that the slope of difficulty ramps up as your weld angles challenge gravity. Getting comfortable upside down (or sideways) is hard work. However, each position has value in different industries, so you may eventually want to master them all.
If you stay in the 1G welding position realm for a while to perfect your technique, that is fine. Everyone’s learning curve will differ. For instance, some welders at Red River spend entire projects only using 1G because their modular spool packages require mostly flat welds. Others might shift into complex angles once they move into field installation. No matter the path you choose, keep forging ahead. Those advanced angles might feel impossible at first, but recall how the fundamentals from 1G welding position,steady heat, stable angle, and consistent travel speed still apply.
Look at Real-World Tips
Whether you dream of building custom furniture, fabricating structural beams, or working in the energy sector, hearing from real welders can be reassuring. Many Red River welders share these tips for mastering the 1G welding position:
- Start with short weld beads (3–4 inches) before attempting a full seam. This helps isolate issues without wasting material.
- Keep your workbench at waist height. Good posture is vital for angle control in the 1G welding position and prevents fatigue.
- Practice good housekeeping. Slag, spatter, and dust can obscure corners or cause contamination when welding in the 1G welding position. Wipe surfaces between passes.
- Invest in a quality wire brush and chipping hammer for stick welding. Removing slag between passes avoids porosity.
- Don’t skip preheating thicker plates. Warming the edges helps prevent uneven cooling and cracking.
Many welders also use apps to log machine settings for the 1G welding position, helping track progress and repeat winning setups. A quick smartphone photo of each pass can make reviewing and improving technique simple.
Why the 1G Welding Position Is Essential for Building Strong Welding Skills
The 1G welding position serves as the foundation for every welder’s skill set. It offers beginners a stable, flat environment to master core techniques like torch angle, travel speed, heat control, and safety habits. While mistakes are common, they provide valuable learning opportunities that shape stronger technique. By practicing with proper equipment, adjusting machine settings, and recording results, welders build confidence and consistency. Even experienced professionals return to 1G welding positions for certain projects, as it saves time, improves quality, and enhances safety, especially in prefabrication work. Mastering 1G welding positions not only prepares welders for advanced positions but also strengthens their overall craftsmanship and career growth.
Take the Next Step in Your Welding Journey
Are you ready to put the 1G welding position into practice? Start with the right gear, focus on safety, and refine your technique. Whether your goal is certification, industrial welding, or personal projects, mastering a 1G welding position will give you the foundation to succeed in every position that comes after. Contact us today!
Frequently Asked Questions
1. What is the 1G welding position?
It is the flat or horizontal position where plates or pipes are laid flat for welding, making it the easiest for beginners.
2. How to weld in 1G welding position?
Set up the workpiece flat, adjust heat and wire feed for the metal thickness, maintain a steady travel speed, hold a 10–15° torch angle, and watch the weld puddle for smooth, even beads.
- What does 1G mean in welding?
In welding, 1G means a flat groove weld position where the plate or pipe is set horizontally, letting the welder create a horizontal bead with gravity helping keep the molten pool stable.
- Why is the 1G welding position taught first?
Because it’s stable, simple, and safe, it is perfect for developing welding fundamentals before progressing to harder positions.
5. What are common challenges in the 1G welding position?
Beginners often face uneven beads, lack of fusion, or excess spatter, but these improve with practice and proper settings.
6. How does 1G compare to other welding positions?
It’s easier than vertical, overhead, or 6G positions, but still forms the foundation for advanced welding work.
Key Takeaways
- The 1G welding position is the easiest and safest for beginners.
- It provides a strong base for learning torch control and puddle management.
- 1G reduces spatter and strain compared to vertical or overhead welding.
- Used widely in training, prefabrication, and pressure vessel manufacturing.
- Mastering 1G sets you up for certifications and advanced positions.