Different weld positions, from beginner-friendly 1G to expert-level 6G, define the orientation, technique, and difficulty of a weld, affecting quality, efficiency, and safety. Mastering multiple positions through practice and training builds versatility, improves weld consistency, and opens higher-paying career opportunities in industries like construction, oil, and gas.
Understanding Different Weld Position in Welding
If you are exploring a different weld position for your projects, you might be curious about what makes each orientation unique. The American Welding Society (AWS) recognizes multiple different weld position, each with its own techniques, challenges, and ideal use cases. At first glance, welding may appear similar across tasks, but a closer look reveals how each position affects quality, efficiency, and safety. From flat welding on a bench to angled pipe welding overhead, choosing the right approach helps you weld more confidently, deliver stronger joints, and enjoy a smoother learning curve.
A survey of welding professionals found that training in multiple different weld position often boosted career prospects by 15%. If you are an aspiring welder or an experienced fabricator, understanding the subtle differences in each different weld position can expand your skill set, improve consistency, and reduce costly do-overs. Good news, these positions are more accessible than they first appear once you practice the basics and get comfortable with the gear.
In this article, you will find an overview of the most common welding positions, 1G, 2G, 3G, 4G, 5G, and 6G, plus a few guiding tips on safety and technique. You will also discover how modular fabrication experts, like the team at Red River, approach each different weld position to tackle everything from pressure vessels to entire prefabricated modules. Let’s begin by looking at why mastering a different weld position matters for your productivity, project scope, and personal development.
Recognize factors that shape your choice
Welding positions are not arbitrary labels; they are recognized patterns that define how you hold your materials, direct your torch, and control your weld puddle. Your decision often hinges on a few factors:
- Project requirements: Some products, like large pipes or pressure vessels, may call for overhead welding or a specific angle.
- Material and thickness: Heavier, thicker metals could favor flat or horizontal positions to reduce complexity. Thinner pieces might need extra care in vertical or overhead positions.
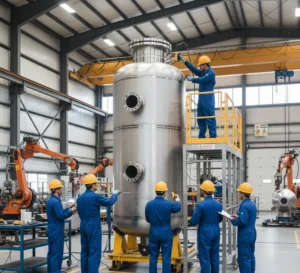
- Location and environment: Prefabrication in a controlled shop setting, like the Red River facility, can let you manipulate workpieces to a more comfortable position. By contrast, field welders may have to adapt their approach at a cramped or elevated site.
- Personal skill level: You will want to sharpen fundamental techniques in easier positions, such as 1G, before tackling advanced angles like 6G.
- Equipment and safety: Specialized jigs or safety harnesses can influence feasibility, especially if you are welding overhead.
Some industry professionals combine these factors with Lean Six Sigma principles to streamline processes and cut down errors. At Red River, for instance, a strong background in modular fabrication means they often design projects in a way that minimizes on-site overhead or vertical welding, reducing the chance of human error due to tough angles. Because each different weld position can add complexity and raise the odds of defects and rework, it is vital to match the different weld position to the project for the best results.
Explore the main welding positions
In welding, you will see positions classified by numbers and letters (for example, 1G, 2G, etc.). “G” refers to groove weld. Fillet welds use an “F,” but in many discussions, the G classifications take center stage for pipes, vessels, or plate work. Here is an overview of each major weld position, along with tips for building confidence in each.
1G, the flat weld position
When you hear “flat position,” it usually means you are welding horizontally on the top side of your workpiece. In many shops, this is the first method taught, because gravity and posture are more manageable here. If you are learning how to hold your welding electrode or perfect your weld bead, this different weld position is typically the simplest place to start.
- Common uses: The 1G method is popular for large metal plates, preliminary practice, and projects that can be easily placed on a bench.
- Advantages: It offers stability, lower defect rates, and better control of the molten puddle.
- Challenges: Because it is easier, you might get overly comfortable and neglect advanced skills you need for angled welds.
If you want to dive deeper, you might find more details at 1g welding position or see why novices often ask what does 1g mean in welding when starting out.
2G, the horizontal position
In 2G, your pipe or plate is oriented horizontally, but the weld seam runs vertically, forcing you to move your arm sideways to complete the weld. This different weld position demands a bit more technique than 1G because you must fight gravity pulling the molten metal downward as you move along a horizontal axis.
- Common uses: Structural beams, pressure vessel shells, or modular skids where surfaces cannot be fully rotated to a flat orientation.
- Advantages: Once you handle the side flow of the weld puddle, you will build fine control over speed and penetration.
- Challenges: Consistency is key. You may see sagging or undercut if you do not carefully watch your heat input and travel angle.
For more insights, check out what is 2g welding position or learn practical tips by visiting how to do 2g welding position.
3G, the vertical weld position
Vertical welding can be done uphill or downhill, depending on project specs and material thickness. When you weld uphill (from bottom to top), you typically maintain better penetration but must manage heat carefully to avoid a weld pool that drips. If you weld downhill (from top to bottom), you will move faster, but this different weld position is typically used for thinner materials to reduce burn-through.
- Common uses: Stacked steel supports, tank walls, or tall metal rigs.
- Advantages: Stronger joints for certain vertical segments and a chance to refine your travel angle.
- Challenges: Gravity works against you more than in 2G, so you need to tweak your travel speed, electrode angle, and voltage.
You can see more about the specifics at 3g welding position or compare approaches in what does 3g welding position mean.
4G, the overhead position
Overhead welding, labeled as 4G, is where your weld joint is located above your head. You hold your welding gun upward, and the molten metal drips downward toward you. Although this different weld position is widely viewed as more difficult, it is often mandatory for many real-world structures or pipeline systems that cannot be flipped. Thanks to prefabrication, many shops try to limit overhead welding in final assembly, but certain projects still require this different weld position.
- Common uses: Roof structures, overhead pipes, or integrated modules in enclosed spaces.
- Advantages: Mastering overhead can position you as a versatile welder who can tackle tough angles.
- Challenges: Molten metal can drip onto you, so you need sturdy protective gear and precise motion. A single slip can cause slag or spatters to become a safety hazard.
If you want a step-by-step approach, you can see how to do 4g welding position. For test preparation, read how to pass 4g welding position test.
5G, the pipe on its axis
5G welding is an advanced pipe orientation where the pipe remains in a fixed horizontal position, and you must weld around it 360 degrees. This different weld position requires adapting to changing angles as you move your torch, combining elements of flat, vertical, and overhead welding. Many pressure vessels and industrial piping systems rely on this different weld position for secure, leak-free seams.
- Common uses: Critical pipe sections in oil refineries, chemical plants, or large-scale HVAC systems.
- Advantages: Once you master it, you can handle a wide range of pipe-based projects that pay well.
- Challenges: Working around the pipe’s circumference involves multiple transitions of your body position. Speed and heat are crucial to avoid incomplete fusion.
To learn more, look at what a 5g welding position or get hands-on tips in how to do 5g welding position.
6G, the toughest angle
Often called the ultimate test, 6G positions the pipe at a 45-degree angle. You cannot rotate the workpiece, so you will face overhead, vertical, and horizontal segments as you rotate around the joint. This different weld position is considered one of the toughest because it combines multiple orientations in a single test. Passing a 6G exam proves you can master nearly any different weld position required in the field.
- Common uses: High-pressure pipe systems, chemical processing lines, or confined installations that demand skilled welders.
- Advantages: Mastery of 6G often increases job opportunities and verifies you can handle complex angles.
- Challenges: Maintaining consistent travel speed is tough. You also need stable body positioning and top-notch torch control throughout the entire pass.
For step-by-step directions, see how to weld in 6g position. If you are curious why many employers require this certification, check out why is 6g welding position important.
Learn common challenges and tips
Embracing multiple different weld position is a journey. You will occasionally face spatters, uneven beads, or poor penetration as you move up from easy positions to more advanced ones. Here are a few tips that can help you along the way:
- Keep your posture stable: Whether you are tackling 1G on a bench or arching your back for overhead 4G, stable footing or a reliable scaffold helps reduce muscle fatigue.
- Adjust travel angle: A slight change in angle can prevent weld pool sag or stretch penetration. Many welders aim for a 10 to 15-degree angle, but your material or technique might require tweaks.
- Fine-tune amperage and voltage: In overhead or vertical positions, high heat can cause drips. Start slightly lower and adjust as needed.
- Practice consistent weaving: Smooth, uniform passes help you distribute the filler metal evenly.
- Use tack welds: If your workpiece can shift, tack it in place first. This strategy can help maintain alignment and reduce the difficulty of continuous welding passes.
- Reflect on progress: Consider keeping a quick log of what worked well during your welding session and what did not. Good news, you can spot patterns faster than you think and refine your technique in the next round.
If you prefer a structured approach, you can review formal process improvement methods such as Lean Six Sigma, which professionals like those at Red River incorporate to reduce variation and boost quality in each different weld position.
Follow safety best practices
Welding in a different weld position can expose you to higher safety risks. Overhead welding drips molten slag, vertical welding can redirect sparks toward your gloves, and 6G often places you in tight or elevated spaces. To lower these risks:
- Wear proper protective gear: Fire-rated jackets, welding helmets, gloves, and steel-toed boots are essential if you are in or near the welding area.
- Use reliable ventilation: Fumes accumulate faster in overhead or enclosed scenarios. Keep a fan or fume extractor to clear airborne contaminants.
- Communicate with your team: When you change positions, your posture and vantage point may obstruct your line of sight. A spotter or partner can alert you if hazards arise.
- Follow facility protocols: Reputable shops, such as Red River, enforce a zero-tolerance policy on unsafe behavior. They rely on thoroughly trained welders, open communication, and continuous improvement programs to minimize incidents.
Prefabrication can also help mitigate these safety hazards. By assembling components in a controlled environment, often at floor level, fabricators like Red River reduce on-site overhead or vertical welding. This strategy keeps more tasks in a stable different weld position, minimizing risk, and ensures welders can work safely across every different weld position.
Consider the Red River approach
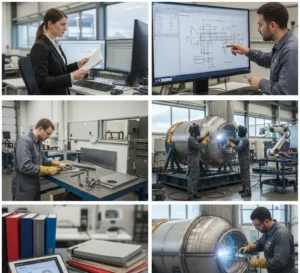
You may wonder how professional teams streamline their welding processes across each different weld position. At Red River, the core philosophy centers on strong planning, modular design, and a commitment to training. By modeling entire projects in 3D modeling, they can anticipate potential conflicts or tricky joints. Then, they create prefabricated modules in facilities with a controlled climate, ensuring fewer errors and better weld repeatability in every different weld position, and fostering expertise in every different weld position for consistent, high-quality results.
Key benefits of this approach include:
- Less exposure to tough angles: Whenever possible, modules are flipped so you can weld in safer, more comfortable positions.
- Faster turnaround: Prefabrication shortens lead times by removing weather delays or complicated scaffolding setups on the job site.
- Improved quality: With in-house quality control, traceable materials, and AWS certifications, you can trust that each weld meets the project’s standards.
This method is especially relevant to complex pressure vessels or piping systems where leaks can be costly. By applying a standardized approach, rooted in thorough training, data analysis, and quality procedures, Red River helps you focus on delivering consistent, code-compliant welds in each different weld position the design calls for. This ensures reliability and efficiency no matter which different weld position is required, and mastering every different weld position guarantees versatility across all projects.
Develop your skills step by step
Before you jump into advanced positions, be sure you have a sound foundation in technique. Here are a few ways to ease the learning curve:
- Start with 1G practice: Keep building muscle memory, especially on timing, puddle control, and finishing edges cleanly.
- Progress to horizontal (2G): Introduce slight complexity with horizontal welds. Monitor your speed carefully so you can avoid drips or burn-through.
- Try vertical (3G) with caution: French fries can burn quickly, and so can a weld if you do not control your travel angle upward. Keep additional filler rods on hand if needed.
- Experiment with overhead (4G): Work in short intervals to protect your neck and posture. Adjust your helmet to maintain clear visibility of the puddle.
- Tackle 5G and 6G with mentors: If possible, find an experienced welder or an in-house trainer to watch you. In advanced positions, a second set of eyes can prevent repeated mistakes.
Remember, it is normal to feel overwhelmed in overhead or pipe scenarios. Welders at Red River, for example, frequently cross-train in multiple stations before handling specialized tasks on intricate pressure vessel skids. By practicing in each different weld position, you can build confidence and adaptability. Over time, rotating among roles will reveal which different weld position feels natural and which requires extra focus, and mastery of every different weld position ensures readiness for any project challenge.
Plan your path to certification
Many industries require certifications or performance qualification tests to confirm you can handle each different weld position under real-world conditions. The 6G test is often considered the pinnacle, but even 3G or 4G qualifications in a different weld position can unlock higher-paying opportunities or specialized roles. Building proven expertise in every different weld position strengthens your career prospects and showcases your versatility. Before scheduling any exam:
- Study the code: Find out which standard your employer or client requires. AWS, ASME (American Society of Mechanical Engineers), or API (American Petroleum Institute) each have guidelines.
- Practice with test coupons: Use plates or pipes that match your code’s thickness and diameter.
- Maintain your gear: A well-tuned welder, stable clamps, and fresh electrodes can improve consistency.
- Seek feedback: Even if you are experienced, a quick tip from a colleague might save you from failing a bend test or X-ray inspection.
At Red River, compliance with ASME standards is paramount for pressure vessel manufacturing. Welders with U4 and R stamp familiarity are highly valued because they show proven skills and a commitment to safety. The same thorough approach applies to every different weld position, ensuring top-tier results and minimal rework. No matter which different weld position is required, welders are trained to deliver consistent quality, and mastery of each different weld position reinforces Red River’s reputation for excellence.
Check a quick summary table
Below is a quick comparison of the primary G positions, their orientation, typical application, and relative difficulty. This overview highlights how each different weld position varies in angle and complexity, giving you a clearer picture of when to apply a specific different weld position.
| Position | Orientation | Typical Application | Relative Difficulty |
| 1G | Flat (horizontal workpiece) | Basic plates, simple assemblies | Easiest |
| 2G | Horizontal (vertical weld seam) | Beams, large parts that cannot be flat | Moderate |
| 3G | Vertical seam (up/down) | Vertical steel frames, tank sides | Intermediate |
| 4G | Overhead | Roofs, ceilings, overhead pipes | Challenging |
| 5G | Pipe, horizontal axis | Critical piping, pressure applications | More difficult |
| 6G | Pipe at 45°, non-rotatable | High-pressure lines, advanced modules | Most difficult |
Good news, you do not have to master every different weld position overnight. A balanced training plan and consistent practice will help you progress through each different weld position without feeling swamped. Over time, gaining confidence in every different weld position will make you a more versatile and in-demand welder.
Choose your best fit
Ultimately, no single different weld position is “better” than another across all scenarios. Instead, each different weld position shines under specific conditions, and mastering more than one different weld position gives welders the flexibility to adapt to any project need.
- Stick to 1G for new learners or straightforward tasks.
- Try 2G or 3G to grow your expertise with horizontal or vertical challenges.
- Move into 4G or 5G if you are comfortable coping with awkward angles and want to expand your versatility.
- Aim for 6G if you want to work on complex industrial projects, such as those in oil and gas or specialized manufacturing.
At Red River, the workforce includes a variety of welders trained in multiple different weld position. Team members are encouraged to expand their skills in each different weld position, leading to improved pay, recognition, and a broader role in ever-evolving manufacturing processes. Mastery of every different weld position also strengthens team versatility and ensures consistent quality across projects.
Different Weld Position and Your Welding Growth
If you are looking for your perfect different weld position, start by analyzing your project requirements, skill level, and available equipment. Experiment with each orientation, from flat 1G all the way to the advanced 6G angle. Keep safety at the forefront, refine your technique, and gather feedback from experts. By mastering each different weld position, you build a foundation for safer, stronger, and more efficient welds.
Master Your Welding Career with Different Weld Position Training
Start practicing one new different weld position this week. Whether overhead, vertical, or pipe welding, consistent training improves performance and opens career opportunities (request a quote).
Frequently Asked Questions
1. What are the different welding position?
The different welding positions are 1G, 2G, 3G, 4G, 5G, and 6G, each describing how the welder works on the joint.
2. What is the 6g welding position?
The 6G welding position involves welding a pipe fixed at a 45-degree angle, making it one of the most challenging tests.
3. What is the 1g welding position?
The 1G welding position is a flat position where the workpiece lies flat, and the welder applies the bead from above.
4. What is 2g welding position?
The 2G welding position is a horizontal position where the welder works on the vertical face of the joint.
5. What is the 3g welding position?
The 3G welding position is a vertical welding position where welding is performed either upward or downward along the joint.
6. What is the 4g welding position?
The 4G welding position is an overhead position where the welder works from underneath the joint.
7. What is the 5g welding position?
The 5G welding position is a fixed horizontal pipe position where the welder welds around the pipe without rotating it.
Key Takeaways
- Different weld position determine orientation, technique, and difficulty level in welding.
- Mastering multiple positions improves safety, efficiency, and quality.
- Beginners should start with 1G before progressing to advanced positions like 6G.
- Industries such as oil, gas, and construction rely heavily on welders trained in different positions.
- Prefabrication methods, like those at Red River, help reduce difficult positions and improve consistency.
Related Blog Post
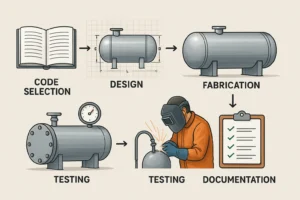
Pressure Vessel Design & Engineering: Concept to Launch
What is Pressure Vessel Design and Engineering: Code-Ready Guide
What are the Key Factors in Pressure Vessel Engineering
How Do You Design a Pressure Vessel: A Step-By-Step Guide